
By: Team Heart² Since: Aug 2018 Last updated: November 2018 Licence: MIT
- 1. Introduction
- 2. Quick Start
- 3. Features
- 3.1. Viewing help :
help - 3.2. Logging in :
login - 3.3. Exiting the program :
exit - 3.4. Logging out :
logout - 3.5. Registering a new account :
register account - 3.6. Change the current password :
change password - 3.7. Working with contacts
- 3.8. Working with a specific contact
- 3.9. Listing entered commands:
history - 3.10. Undo the previous command:
undo - 3.11. Redo the commands undone:
redo - 3.12. Saving the data
- 3.1. Viewing help :
- 4. Command summary
- 5. FAQ
1. Introduction

Welcome to Heart²! Heart² is a desktop software for wedding planning agencies to efficiently manage clients' and agency companies' profiles. You can find suitable vendors providing services for couples using just a few keystrokes with our enterprise feature set. Jump over to Section 2, “Quick Start” to get started.
2. Quick Start
This section provides a quick overview to get you started with the application.
-
Ensure you have Java version
9or later installed in your Computer. -
Download the latest
heart2.jarhere. -
Copy the file to the folder you want to use as the home folder for your Wedding Planner.
-
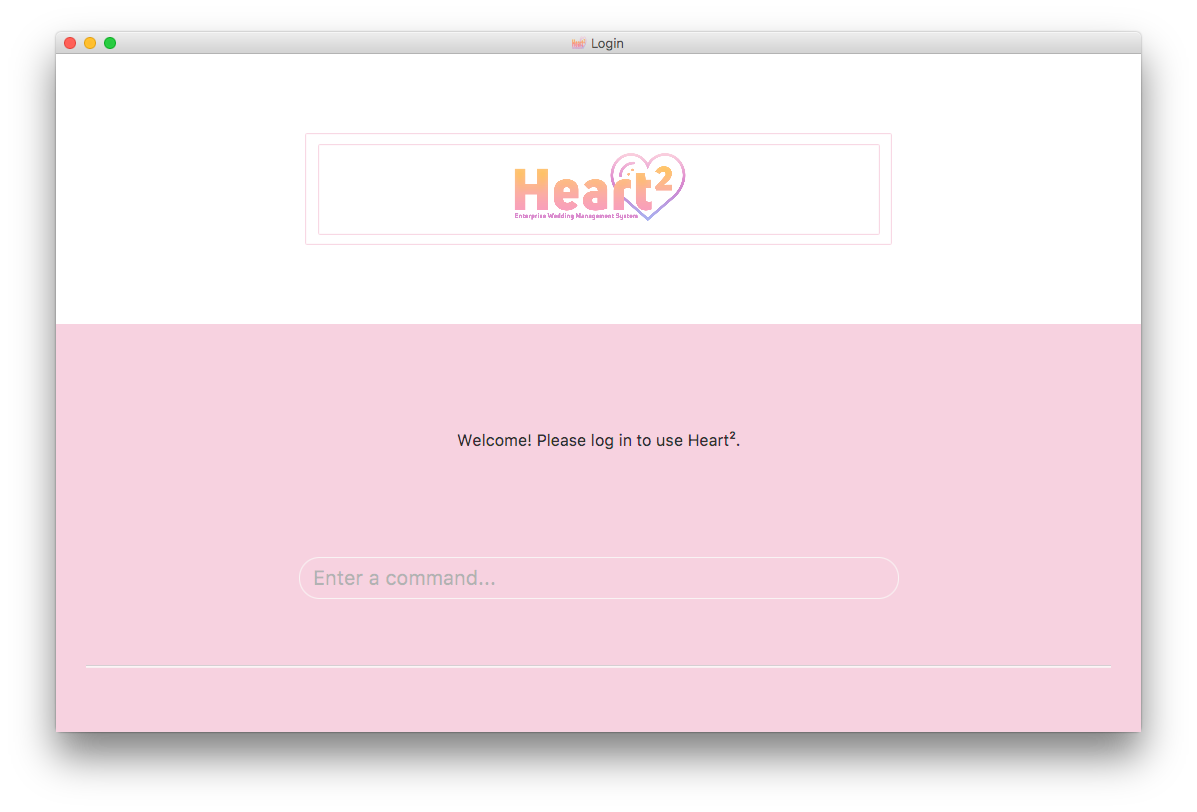
Double-click the file to start the app. The GUI for the login page should appear in a few seconds:
-
Type the command in the command box and press Enter to execute it.
e.g. typinghelpand pressing Enter will open the help window. -
Refer to Section 3, “Features” for details of each command.
-
After logging in, the GUI for the main page should appear:

3. Features

The following format is consistent for all the commands listed in this section.
-
Words in
UPPER_CASEare the parameters to be supplied by the user e.g. inadd n/NAME,NAMEis a parameter which can be used as inadd n/John Doe. -
Items in square brackets are optional. E.g
n/NAME [t/TAG]can be used asn/John Doe t/friendor asn/John Doe. -
Items with
… after them can be used multiple times, including zero times. E.g.[t/TAG]…can be used ast/friend,t/friend t/familyetc. -
Parameters can be in any order. E.g. if the command specifies
n/NAME p/PHONE_NUMBER,p/PHONE_NUMBER n/NAMEis also acceptable. -
<CONTACT_TYPE>is to replaced with eitherclientorvendor. -
<ID>is to replaced with a valid ID, and only positive integers are recognised as an ID. -
An example table shows the usage with actual data for a particular command. Below shows one instance of such a table.
|
|


Callouts are rectangular boxes with an icon and words to point out various types of information. Below are 3 callouts that will be used throughout this document:
| This represents a note. A note indicates additional important information. Be sure to read these notes as they might be applicable to you! |
| This represents a tip. A tip denotes something that is often handy, and good for you to know. Tips are often less crucial, and you can choose to skip them. |
| This represents a warning. A warning denotes something of crucial importance, and you should be extremely cautious when reading the statement. |

Heart² is designed with an intuitive command syntax for your ease of use. The following section documents all the commands available for you in this application.
Only help, login, and exit commands are available prior to logging in. The rest of the commands are only available after logging into the application, and might be marked as Unknown Command prior to logging in.
|
For all commands that require an #ID, your ID must be a valid ID that matches the entries that you have. This user guide’s ID #123 may not be available in your data. Change the ID accordingly to the ID that you wish for a command.
|
3.1. Viewing help : help
Opens a new window that contains the user guide to help you find out any information you need.
Format: help
You cannot undo a help.
|
3.2. Logging in : login
Securely logs you in to access the system. By default, a root account with SUPER_USER privilege is provided, using the username rootUser and password rootPassword.
Format: login u/USERNAME p/PASSWORD
| Condition of use: You must not be logged in. Otherwise, it will be an unknown command. |
You cannot undo a login.
|
|
|
3.4. Logging out : logout
Securely logs you out of the system.
Format: logout
You cannot undo a logout.
|
3.5. Registering a new account : register account
Register a new account for this application. You can only register a new account after logging in with a SUPER_USER account. By default, rootUser is a default account with SUPER_USER privilege.
Format: register account u/USERNAME p/PASSWORD r/ROLE
r/ROLE: either r/superuser or r/readonlyuser to create a SUPER_USER account or READ_ONLY_USER account respectively.
|
| It may sound counter-intuitive to require an account before registering a new account. We make this requirement as only authorised personal should be given an account. Ideally, the owner of the application should dictate the account given to employees by helping them register an account. |
You cannot undo registering a new account.
|
|
|
| Username and password cannot be empty, or contain spaces. |
| Make sure your password is typed correctly. There is no confirmation prompt once you execute the command. |
3.6. Change the current password : change password
Change your current account password from an old password to a new password.
Format: change password o/YOUR_OLD_PASSWORD n/YOUR_NEW_PASSWORD
You cannot undo changing of password.
|
|
|
| New password should not be the same as old password, and it cannot be empty, or contain spaces. |
| Make sure your password is typed correctly. There is no confirmation prompt once you execute the command. |
3.7. Working with contacts
There are two types of contacts supported by Heart², namely client and vendor.
All commands pertaining to contacts start with either client or vendor.
|
3.7.1. Adding a contact: add
You can add a contact together with its particulars into Heart² by specifying its contact type first, that is, client or vendor.
Format: <CONTACT_TYPE> add n/FULL_NAME p/PHONE_NUMBER e/EMAIL_ADDRESS a/HOME_ADDRESS [t/TAG]…
| You cannot add a contact that already exists in the application. Two contacts are considered duplicates if they are of the same type (either both clients or both vendors), possess the same name, and either the same phone number or the same email address. |
|
|
|
|
You can undo and redo adding of a contact!
|
3.7.2. Listing and searching for contacts: list
You can view all the contacts of a specific type in a list by specifying the contact type to be shown.
Format: <CONTACT_TYPE> list
|
|
|
|
Heart² also supports searching via name, phone number, email, address and tags for you to quickly find your contacts. To search, simply append your search parameters to the back of the original command.
Only contacts that matches all the search parameters will be displayed to you in the form of a list. Searching is done through substring matching, so you do not need to enter the full name, just part of the name will do.
Format: <CONTACT_TYPE> list [n/FULL_NAME] [p/PHONE_NUMBER] [e/EMAIL_ADDRESS] [a/HOME_ADDRESS] [t/TAG]…
|
|
|
|
3.8. Working with a specific contact
Contacts in Heart² are assigned a unique ID each for you to refer to the contact at any point of time when using Heart².
Commands pertaining to one specific contact have an additional unique ID appended to the back of client or vendor.
|
| These IDs are persistent for one session. Each restart of Heart reassigns IDs to contacts, effectively accounting for deleted contacts and compacting the IDs of your contacts. |
IDs can be similar for client and vendor. However, since the contact type and ID come hand in hand, the contacts are still effectively unique!
|
3.8.1. Viewing a contact: view
You can view detailed information about a specific contact using its unique ID.
This information will be displayed on the right panel in Heart².
view shows you all the information regarding the specific client, which includes the name, phone number, email address, tags, residential (client) or office (vendor) address and services requested (client) or offered (vendor).
|
Any command following view will hide the information shown before on the panel on the right.
|
Format: <CONTACT_TYPE>#<ID> view
|
|
|
|
Clicking on the contact panels on the left of Heart²'s GUI corresponds to a view command for that contact!
|
3.8.2. Deleting a contact: delete
You can also delete a contact from Heart², by specifying its unique ID.
Format: <CONTACT_TYPE>#<ID> delete
|
|
|
|
You can undo and redo deleting a contact!
|
3.8.3. Updating a contact: update
You can also update a contact’s particulars, again by specifying its unique ID, followed by the updated fields.
Format: <CONTACT_TYPE>#<ID> update [n/FULL_NAME] [p/PHONE_NUMBER] [e/EMAIL_ADDRESS] [a/HOME_ADDRESS] [t/TAG]…
| You cannot update a contact to another contact that already exists in the application. Two contacts are considered duplicates if they are the same type (either both clients or both vendors), possess the same name, and either the same phone number or the same email address. |
| When editing tags, adding of tags is not cumulative and existing tags of the contact will be removed. |
You can remove all tags for a contact by updating the contact with t/ (without specifying any tags after it)!
|
|
|
|
|
You can undo and redo updating a contact!
|
3.8.4. Adding a service: addservice
You can add attributes of the services your clients require or vendors can provide by using the
addservice command specified by the contacts' unique IDs.
| Every service can only be added once. Updating this service is not supported. |
| Specify the cost in Singapore Dollars (SGD) to 2 decimal places, and exclude spacing and symbols (e.g. '$' ','). |
Format: <CONTACT_TYPE>#<ID> addservice s/SERVICE_TYPE c/SERVICE_COST
Available service types for SERVICE_TYPE:
|
|
|
|
|
|
|
|
|
|
|
You can undo and redo adding a service to a contact!
|
3.8.5. Automatching for a client: automatch
You can easily find vendors that can fulfil the request services with this command.
Format: client#<ID> automatch
| It only shows you the vendors within the budget requirement that fulfils a particular service requirement of the client. |
|
|
3.8.6. Automatching for a vendor: automatch
You can easily find clients whose service requirements match the services offered by a vendor.
Format: vendor#<ID> automatch
| It only shows you the clients whose budgets can afford the service of the particular vendor. |
|
|
3.9. Listing entered commands: history
Lists all the commands that you have entered in reverse chronological order for this particular session. Histories are deleted upon logging out or exiting the app.
By default, the following commands will have their parameters censored when saving to history. This is because these commands contain sensitive information such as user password.
-
login -
register account -
change password
The command logout will not be saved to history as the session has ended due to logging out.
Format: history
| Pressing the ↑ and ↓ arrows will display the previous and next input respectively in the command box. |
3.10. Undo the previous command: undo
Undo the commands that you have entered in chronological order for this particular session. Once you logout or exit the application, you cannot undo a command from the last session.
Format: undo
The application will only undo commands that modifies the list of contacts: add, update, delete, clear
|
| The application will show either the client list or vendor list corresponding to the command that was undone. |
3.11. Redo the commands undone: redo
Redo the commands that you have undone by undo in chronological order for this particular session. Once you logout or exit the application, you cannot redo a command from the last session.
Format: redo
Commands that have been undone will be reset upon a clear command.
|
| The application will show either the client list or vendor list corresponding to the command that was redone. |
3.12. Saving the data
Address book data are saved in the hard disk automatically after any command that changes the data.
There is no need for you to save manually.
4. Command summary
Below is a summary of the commands available for you to use.
Before logging in
| FEATURE | FORMAT |
|---|---|
To get help |
|
To log in |
|
To close the application |
|
After logging in
| FEATURE | FORMAT |
|---|---|
To register a new account |
|
To change your account password |
|
To add a contact |
|
To add a service requirement |
|
To update a specific contact |
|
To list contacts that matches the inputs |
|
To find a match that fits a particular contact’s requirements |
|
To view a specific contact |
|
To delete a specific contact |
|
To delete all contacts |
|
To list all the commands entered in this session |
|
To undo the previous command |
|
To redo the previous undone command |
|
To get help |
|
To log out of your account |
|
To close the application |
|
Coming in v2.0
| FEATURE | FORMAT |
|---|---|
To retrieve forgotten password |
|
To assigning vendors to clients |
|
To assigning clients to vendors |
|
5. FAQ

Q: How do I transfer my data to another Computer?
A: Install the app in the other computer and overwrite the empty data file it creates with the file that contains the data of your previous Address Book folder.
Q: What platform is this application available on?
A: This application is cross-platform, and can be used on both Windows and Mac OS.
Q: Is this application free-of-charge?
A: Yes, this application is open-source and can be used for free, even commercially.
Q: How can I report an issue?
A: You can raise an issue in the issue section and our team will get back to you as soon as possible.